
In today’s home design and construction industry, visualization plays a powerful role in decision-making. Homeowners no longer rely solely on 2D drawings and floor plans to understand how their future home will look. Residential rendering services have transformed the way architects, builders, and clients collaborate by providing realistic 3D visualizations of home projects before construction even begins.Whether it’s a custom-built house, a renovation, or an interior redesign, residential rendering helps eliminate uncertainty and brings ideas to life. This step-by-step guide explains how residential rendering services work for home projects and how they enhance design accuracy, communication, and overall project success.
Understanding Residential Rendering Services
Residential rendering services involve creating detailed 3D visual representations of home designs. These renderings can include.
-
Exterior house visuals
-
Interior room renderings
-
Kitchen and bathroom visualizations
-
Landscaping perspectives
-
3D floor plans
-
Virtual walkthroughs
Using architectural drawings, material specifications, and design concepts, rendering specialists produce photorealistic images that reflect how the final home will appear.For homeowners, this means seeing the finished product before construction starts. For architects and builders, it means better project planning and fewer misunderstandings.
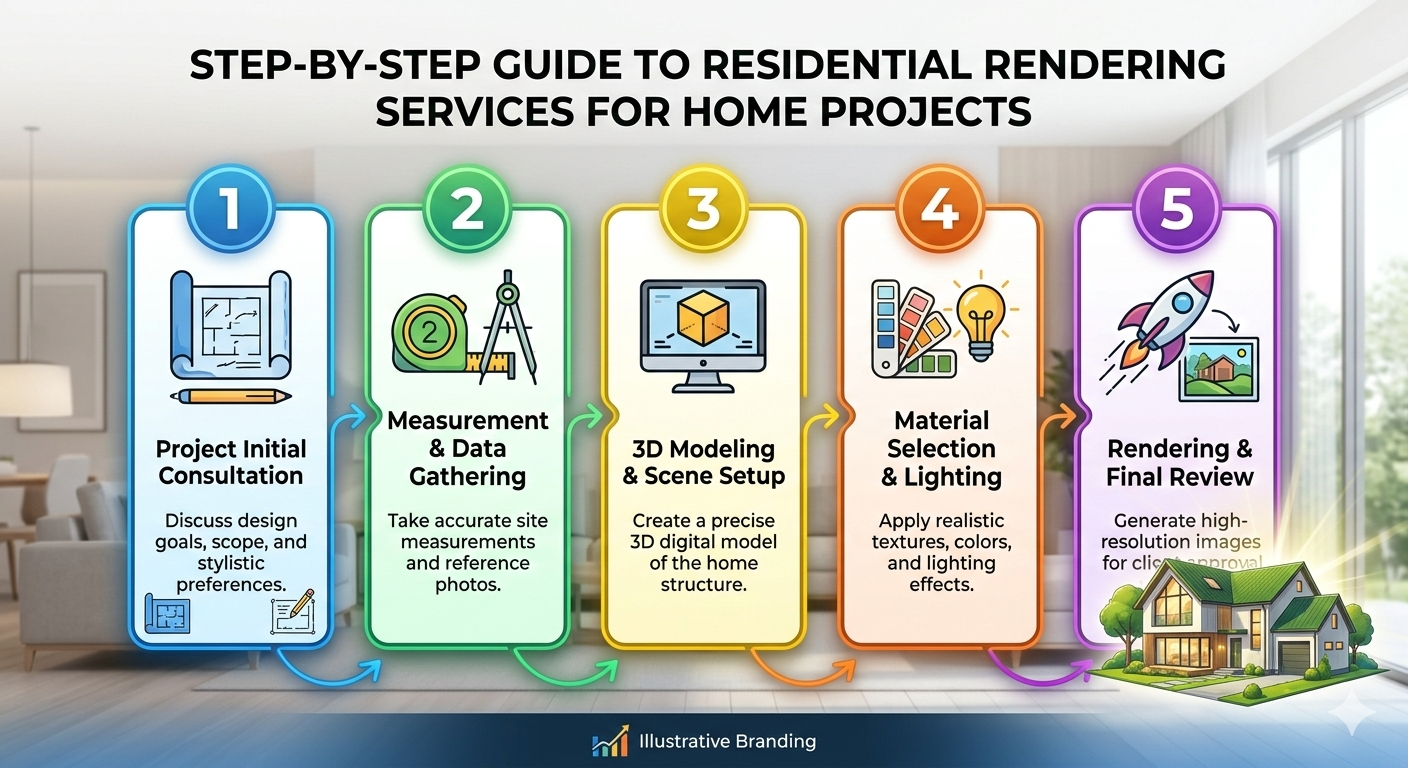
Step 1: Initial Consultation and Project Briefing
The first step in residential rendering services is understanding the client’s vision. During the consultation phase, designers and rendering specialists gather important details, including.
-
Architectural drawings and floor plans
-
Material preferences
-
Exterior finishes and color scheme
-
Interior design themes
-
Lighting preferences
-
Landscaping concepts
Clear communication at this stage ensures that the rendering accurately reflects the homeowner’s expectations. The more detailed the briefing, the more precise the final visuals will beThis step establishes the creative direction for the entire rendering process.
Step 2: Reviewing Architecture
-
Cros-sections
-
Structural details
-
Window and door placements
Accurate interpretation of these drawings is essential. Any inconsistencies or missing details must be clarified before 3D modeling begins. This prevents errors in scale, proportion, or design features.The review phase ensures that the rendering aligns perfectly with the technical documentation.
Step 3: Creating the 3D Model
The next step involves building a digital 3D model of the home. This process converts 2D architectural drawings into a three-dimensional structure.
The 3D modeling stage includes.
-
Constructing walls, floors, and ceilings
-
Adding windows and doors
-
Incorporating roof structures
-
Positioning balconies, porches, and garages
-
Defining room layouts
This model forms the foundation for the entire visualization. Accuracy in dimensions and proportions is critical, as all further enhancements are built upon this structure.
Step 4: Applying Materials and Textures
Once the base model is complete, materials and textures are applied. This step adds realism to the rendering by replicating actual finishes and surfaces.
Examples include.
-
Brick, stone, or stucco exterior finishes
-
Wood flooring and cabinetry
-
Tile patterns
-
Countertop materials
-
Paint colors
Glass and metal elementsHigh-quality texturing ensures that surfaces look authentic under different lighting conditions. The careful application of materials transforms the digital model into a lifelike representation.
Step 5: Adding Lighting and Environmental Elements
Lighting plays a crucial role in creating realistic renderings. Proper lighting enhances depth, shadow, and mood.
Residential rendering services simulate.
-
Natural daylight
-
Sunset or evening lighting
-
Interior artificial lighting
-
Reflections and shadow effects
For exterior renderings, environmental elements are also included, such as.
-
Landscaping and greenery
-
Driveways and pathways
-
Sky backgrounds
-
Surrounding neighborhood contex
These elements help homeowners visualize how the house will appear in its real-world setting.
Step 6: Interior Furnishing and Styling
For interior renderings, furniture and decor are added to create a complete and inviting space. This step often includes.
-
Sofas, tables, and beds
-
Kitchen appliances
-
Bathroom fixtures
-
Lighting fixtures
-
Curtains and rugs
-
Decorative accessories
Styling gives homeowners a clear understanding of space functionality and design flow. It also helps in evaluating furniture placement and layout efficiency.Well-styled interiors make renderings more engaging and realistic.
Step 7: Rendering and Post-Production
After modeling, texturing, and lighting are complete, the scene is processed through rendering software. Rendering converts the 3D model into high-resolution images.
This stage may involve.
-
Adjusting camera angles
-
Enhancing contrast and color balance
-
Refining reflections
-
Improving depth of field
-
Applying final edits
Post-production ensures that the images are polished and presentation-ready. The final output typically includes multiple views from different perspectives.
Step 8: Client Review and Revisions
Residential rendering services often include revision rounds. Clients review the initial visuals and provide feedback regarding.
-
Material changes
-
Color adjustments
-
Lighting preferences
-
Furniture modifications
-
Landscape updates
Incorporating revisions ensures that the final renderings align fully with the homeowner’s vision.This collaborative step enhances satisfaction and prevents design misunderstandings before construction begins.
Step 9: Final Delivery and Usage
Once approved, the final renderings are delivered in high-resolution formats. Homeowners and builders use these visuals for.
-
Design approvals
-
Contractor coordination
-
Marketing materials
-
Real estate listings
-
Permit submissions
High-quality residential renderings can also support pre-construction sales for custom homes or housing developments.
Benefits of Residential Rendering Services for Home Projects
Following a structured rendering process provides significant advantages:
Clear Visualization
Homeowners can see their future home in detail before construction begins.
Better Decision-Making
Clients can evaluate materials, colors, and layouts confidently.
Reduced Design Errors
Identifying potential issues early prevents costly changes during construction.
Improved Communication
Renderings bridge the gap between technical drawings and client understanding.
Enhanced Marketing Appeal
Builders and developers can showcase properties effectively through professional visuals.
Supporting Renovation and Remodeling Projects
Residential rendering services are not limited to new construction. They are equally valuable for renovations and remodeling.
For remodeling projects, renderings help homeowners.
-
Visualize room transformations
-
Compare design alternatives
-
Assess open-concept layouts
-
Preview exterior upgrades
This minimizes uncertainty and improves planning accuracy.
Leveraging Professional Rendering Expertise
Creating high-quality renderings requires expertise in modeling, lighting, and design interpretation. Professional firms such as SMA Archviz provide specialized residential visualization services that ensure accuracy and realism.
By working with experienced rendering professionals, architects and homeowners benefit from.
-
Advanced software capabilities
-
High-end visual effects
-
Efficient turnaround times
-
Detailed project interpretation
Outsourcing residential rendering allows designers and builders to focus on project execution while ensuring premium visual output.
Common Mistakes to Avoid in Residential Rendering
To maximize the effectiveness of rendering services, it is important to avoid common pitfalls.
-
Providing incomplete design information
-
Overlooking material specifications
-
Ignoring realistic lighting conditions
-
Skipping client review stages
-
Rushing the revision process
A structured approach ensures accuracy and quality throughout the workflow.
The Growing Importance of Residential Visualization
Modern homeowners expect more than basic blueprints. The rise of digital marketing, social media, and online real estate platforms has increased the demand for visually compelling home presentations.Residential rendering services meet this demand by offering immersive and realistic visual experiences. From custom luxury homes to compact renovations, renderings enhance clarity and confidence in every stage of the project.
Conclusion
Residential rendering services have revolutionized home design and construction planning. By transforming architectural concepts into realistic 3D visuals, they eliminate uncertainty and improve communication between homeowners, architects, and builders.From initial consultation and 3D modeling to material application and final delivery, each step in the rendering process contributes to accurate visualization and informed decision-making. Whether for new home construction, renovation, or real estate marketing, residential renderings provide clarity, confidence, and creative inspiration.In an industry where visualization influences decisions and investments, following a structured residential rendering process ensures that home projects begin with a clear and compelling vision of the future.